Step 1: You need to have a domain name for which you wish to create your Email Ids. If you don't have any domain name with you, just follow the link to get a domain name: Buy Domain Name
Step 2: After your domain registration, you need to get a hosting package. You can avail any hosting package with CubeHostIndia. Each hosting package has the provision to create unlimited Email Ids.
Step 3: To create an Email account just open your cPanel with the Username, Password provided to you with URL: yourdomainname.com/cpanel after pointing your domain nameserver to our server.
Step 4: In your cPanel under the Email section you will find Email Accounts as shown in Image below, you just need to proceed with it.

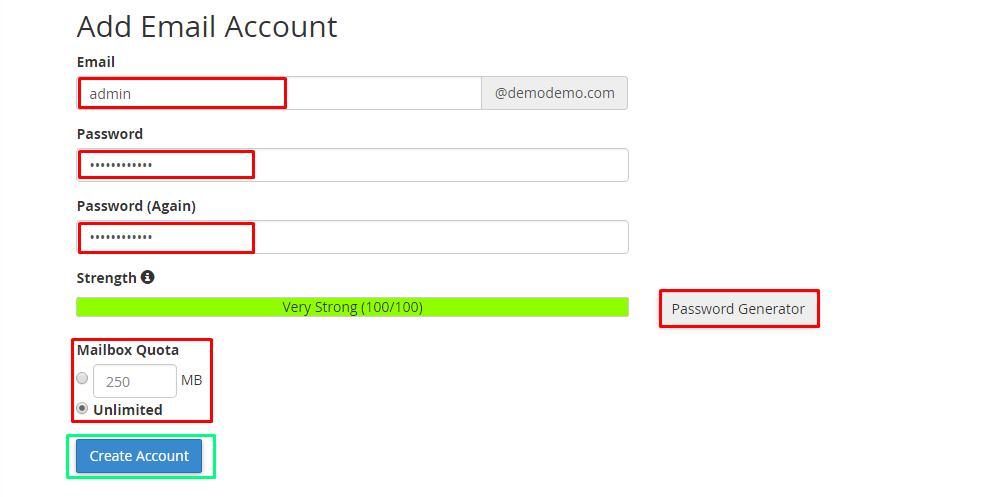
Step 5: After clicking on Email Accounts, you will lead to a page where you can not only add a new email account but also can manage your all previously created email accounts. See the Image below to understand better for adding new email id. Please use a strong password for email id, to prevent it from any type of trouble in future. You can use the Password generator to create random password also.

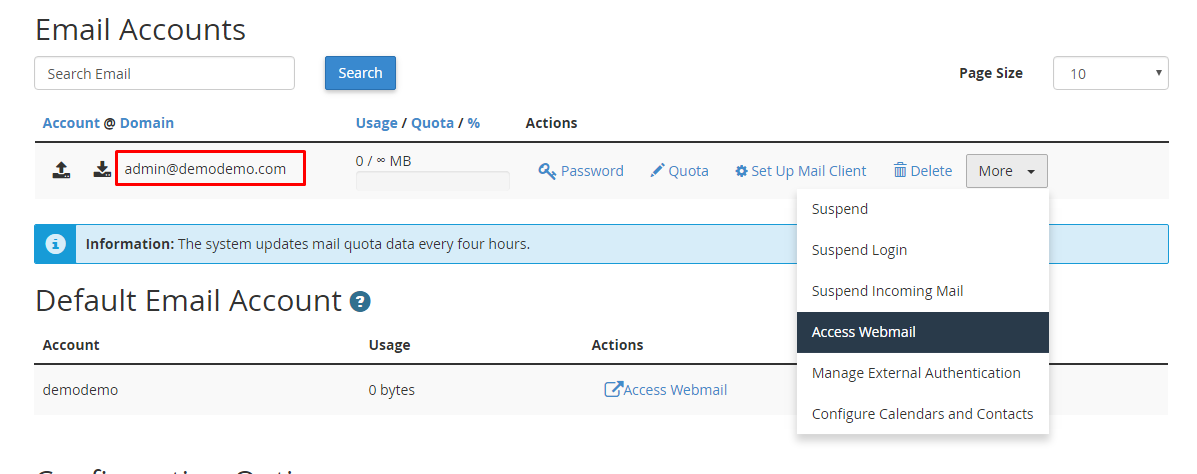
Step 6: As soon as you submit the button with creating an account, the system will create an account as shown in the image below. You can manage the email accounts from this section. There are various functions available, which you can your to manage your email account.
To access your email account there are various methods. Use anyone out of them.
1. Choose the link Access Webmail as shown in Image below.
2. There is one more link in your client area in Left menu to directly open webmail. This link is named as Login to Webmail, just below Login to cPanel.
3. Use any of following URLs with your email id credentials.
yourdomainname.com/webmail
yourdomainname.com/2096
Server_IP:2096

Step 7: In next step, for the first time you will see three different webmail apps installed on the server namely: Horde, Roundcube, SquireelMail. You can opt anyone out of them as your default application. But most of the users prefer to use Roundcube due to its convenient interface. So, you can mark it as your default application for Emails. After then click on the Roundcube app icon to open the webmail.

Step 7: In next step, for the first time you will see three different webmail apps installed on the server namely: Horde, Roundcube, SquireelMail. You can opt anyone out of them as your default application. But most of the users prefer to use Roundcube due to its convenient interface. So, you can mark it as your default application for Emails. After then click on the Roundcube app icon to open the webmail.

Step 8: Your Roundcube Webmail interface is same as shown in the image below, you just need to go through the interface to receive and send the email from this interface. It's very easy and convenient to learn this email interface provided by Roundcube,

We hope that we have provided all the steps to create any professional email account in detail to you. In case you feel any issue in regard to creating an email account, please create a support ticket with it. We will be glad to help you for your each and every issue.
Look like a professional and have great business opportunities ahead....!!


